The Main Bathroom Reveal!
Well now that everyone knows my secret- I’ve been hiding three finished rooms for you because I had to for the TV show they were going to be on, I can finally share the full room reveals!
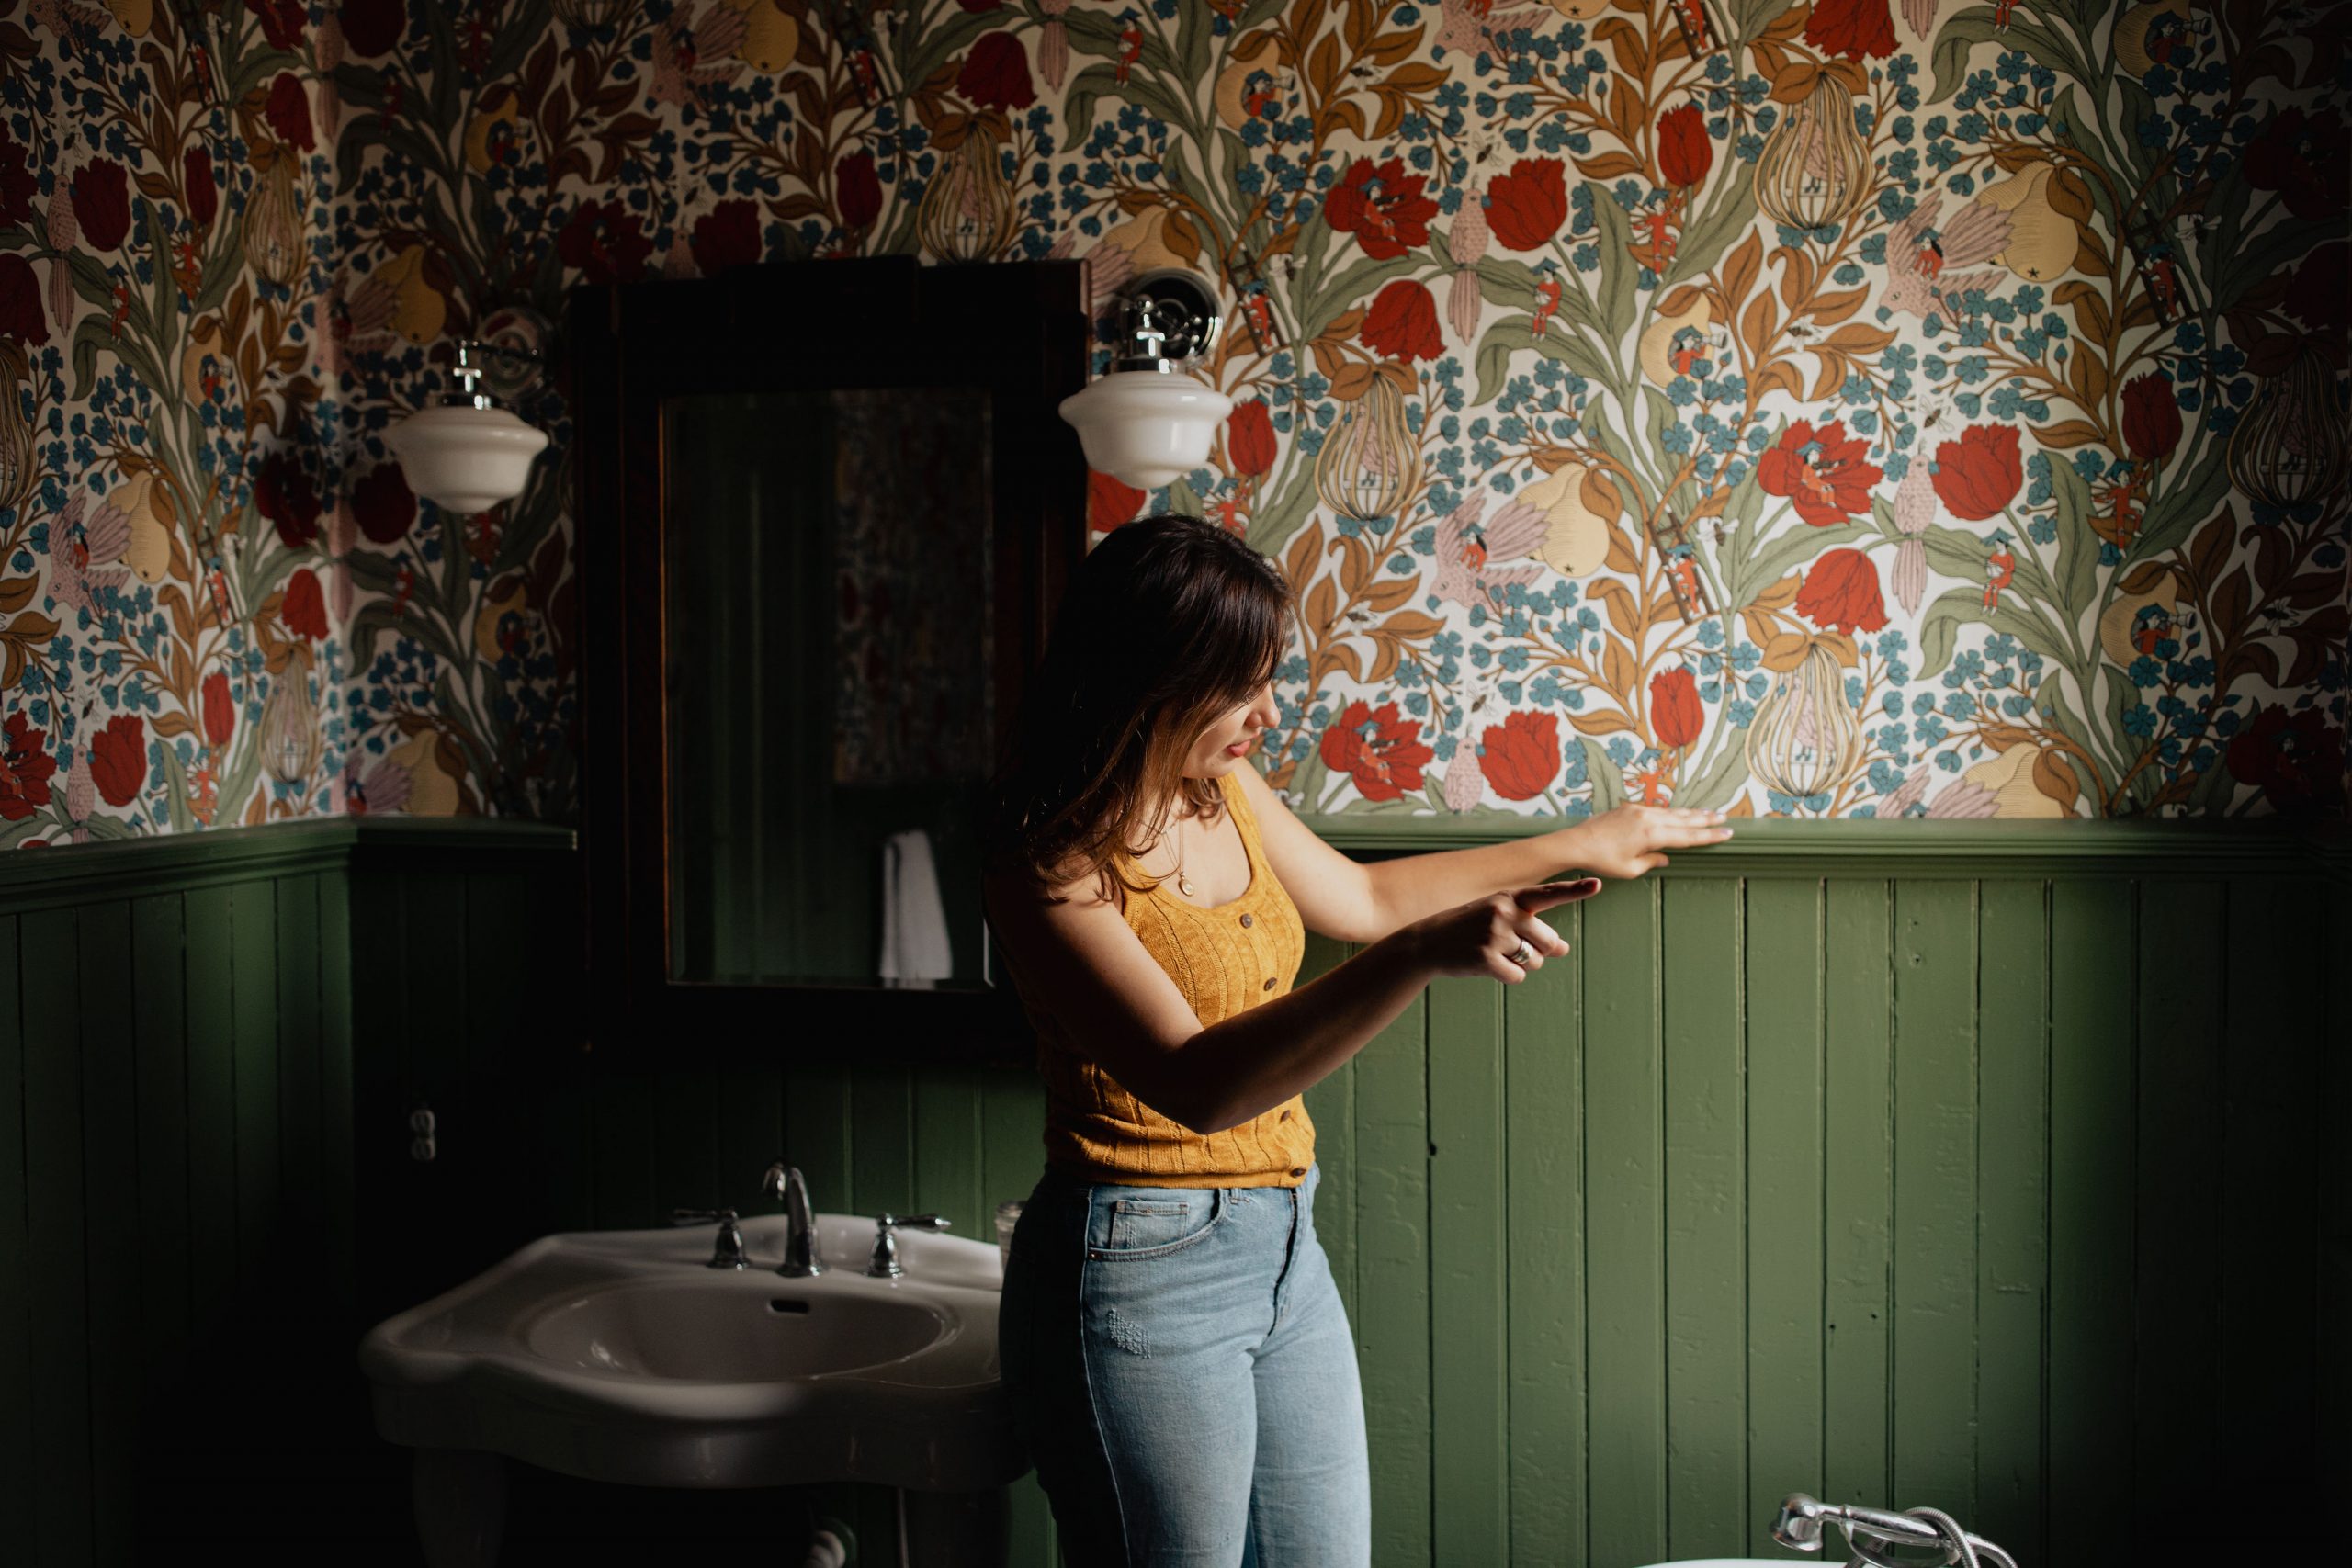
Keeping with the bathroom excitement, today’s post is about another bathroom, the MAIN BATHROOM! This is one of those rooms that when it was finished, it gave me a sense of …ahh, this is going to be a livable structure one day. Marble tile has that effect on a person.
I’m in love with the room for many reasons, but one of the big ones being the perfect combination of new and old that exists there.
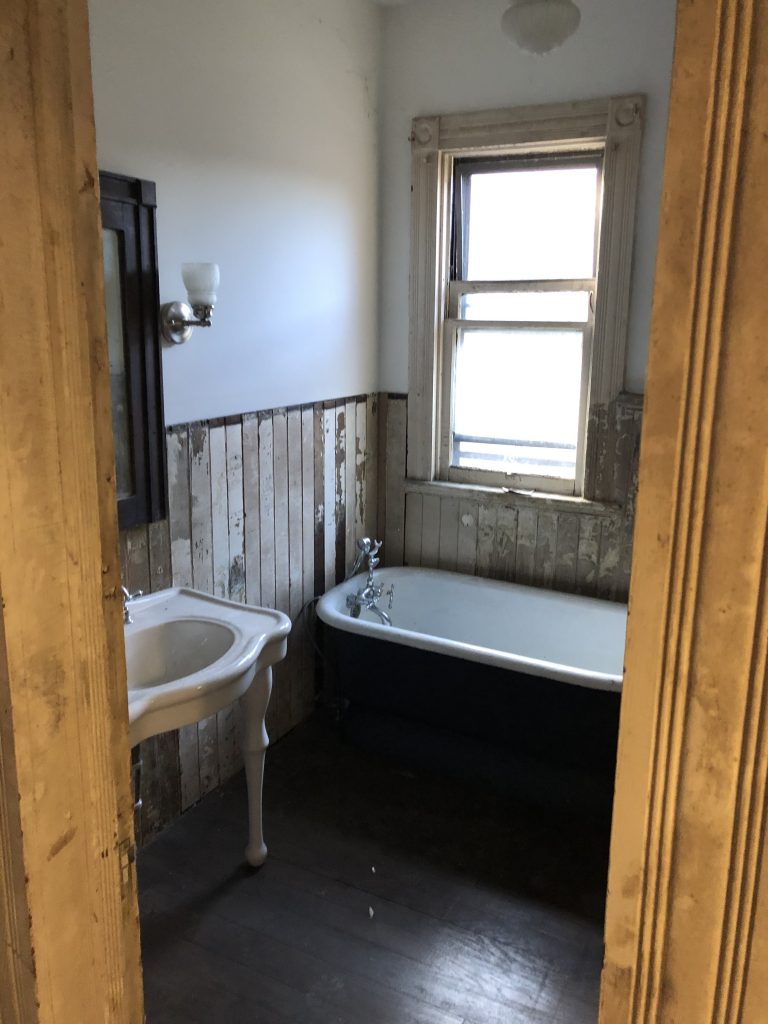
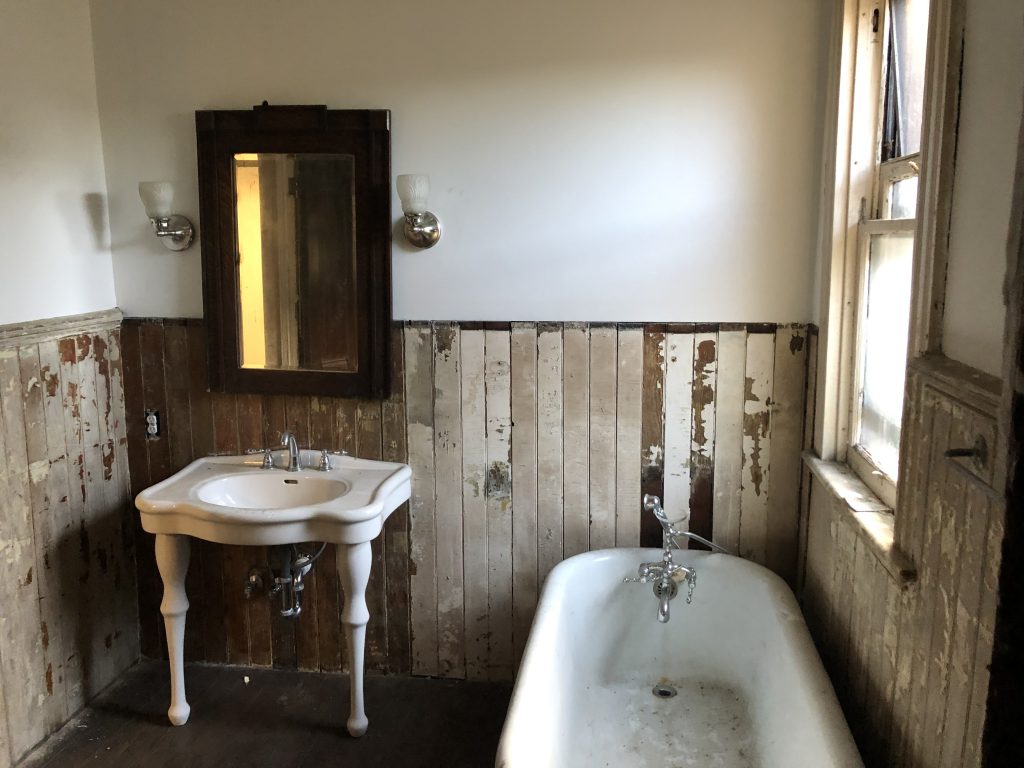
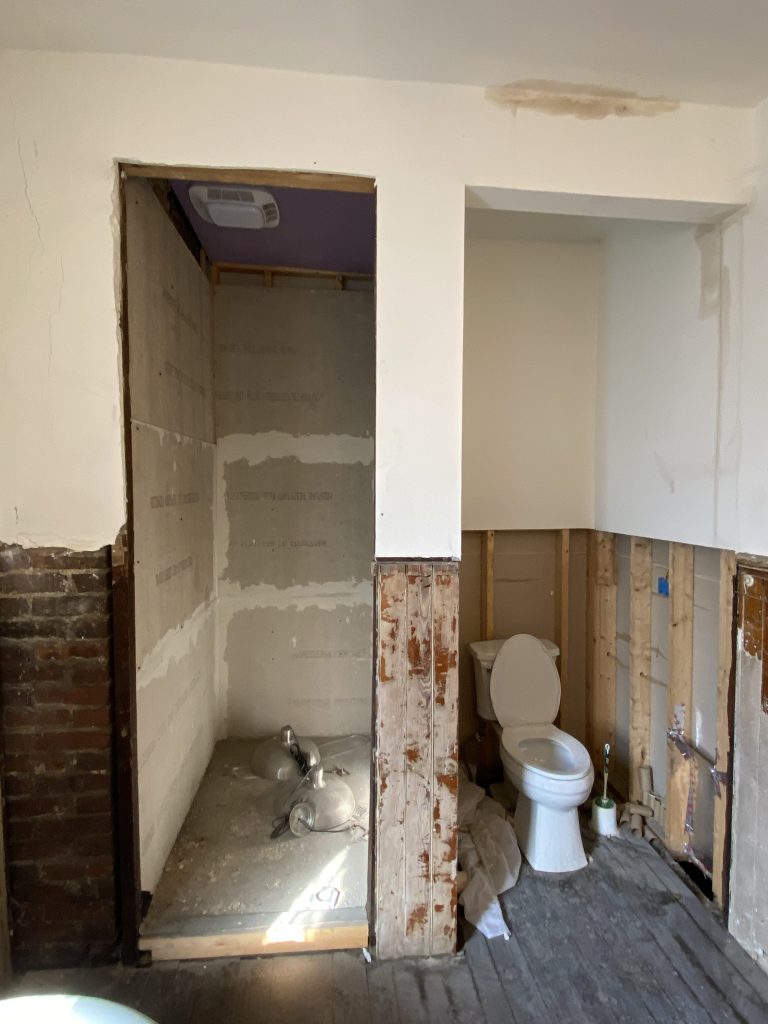
This room was the original bathroom for the house. It retained it’s historic wainscotting, and a big old cast iron pedestal bathtub. But it also was too small to accommodate a toilet and shower, and so the previous owners started the process of remodeling the space to accommodate modern necessities.
They achieved this by taking the back wall of the bathroom, and pushing it out about three and a half feet, essentially borrowing space from the back bedroom to accommodate the shower and the toilet. It was a great idea, and here’s a very technical rendering of that floorplan. The dotted line is where the wall used to be, the solid line shows the current floorplan that accommodates a toilet and shower.

The Before
So when I bought the house, the bathroom was not exactly usable, but serviceable. The toilet was hooked up. So that was something. The fittings were also all either wrong or loose, and so the early days of this project brought a lot of me flooding the bathroom and kitchen beneath. Eventually I just shut everything off. Here’s what we started with.
The Shower
So as you can see, when I bought the house, the general premise of a shower stall was there, but it needed reworking. When it comes to anything plumbing or water, I trust no one, so I ripped out the cement board and underlayment that was there, and had someone basically redo it. I wanted to be absolutely certain that the basin wouldn’t leak, and that the walls would be smooth and plumb enough to have a nice tile finish.
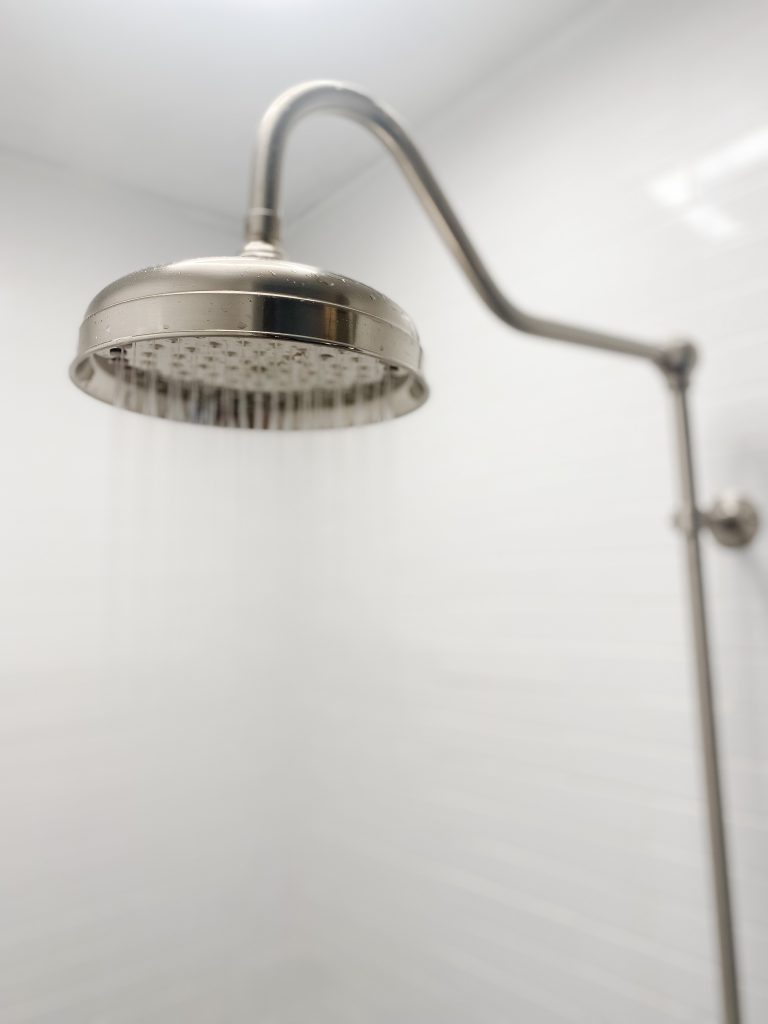
Selecting the tile was pretty simple- I wanted to choose materials that were appropriate for the age of the house, simple and clean, and timeless. I feel like bathrooms in particular can get really trendy, so my motto in selecting the tile and fixtures was to try and pick something that would make sense in the 1920s, 1950s, 1980s, and today. White subway tile and marble penny round never goes out of style.

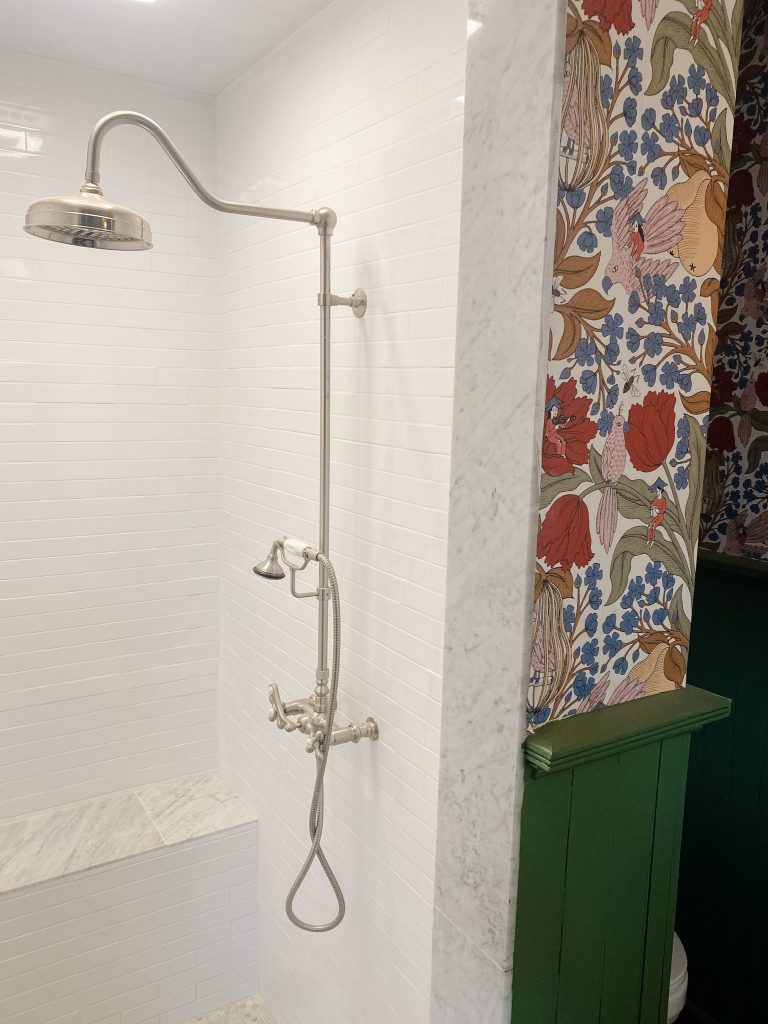
I added a bench, for no reason other than I think niches are ugly (same with accent stripes of tile, no thank you) and selected this shower hardware from Vintage Tub and Bath. I really wanted the effect of a rain shower, with the look of vintage hardware, so I was so pleased with this set. It is surprisingly sturdy and feels expensive. It also has a handheld showerhead which makes dog washing and no hair wash days much easier. All around 10/10.
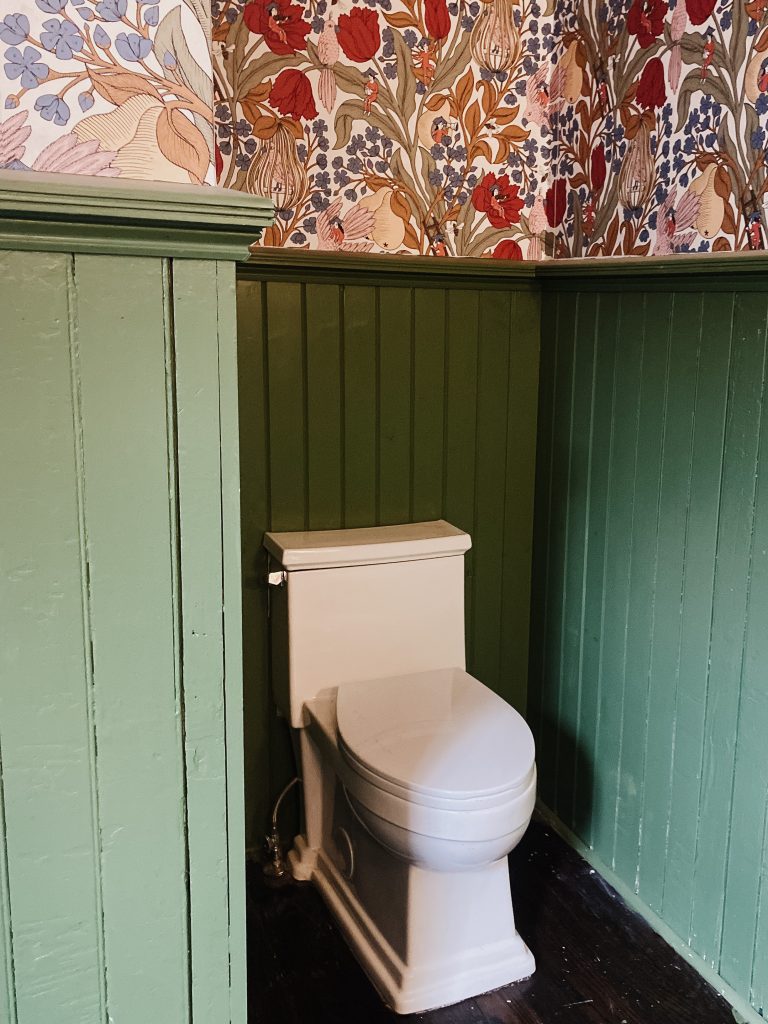
It’s also worth mentioning that Vintage Tub and Bath also sent me the most beautiful, classic toilet as well. A toilet with a smooth pedestal makes cleaning infinitely easier, but often those toilets end up looking so modern. This one is the perfect combination of classic lines, and an easy to clean base. Once again, it’s high quality, feels expensive, and a 10/10.
The Wainscoting
The most charming feature of this whole room, in my humble opinion, is the wainscoting. It is original to the space, and had about three hundred layers of paint peeling away. I admit, I kind of loved the way it looked unfinished. I loved seeing the ghost marks of hardware past, and all the texture from years of neglect.
Lead paint aside, I did decide to give all the paneling a light scrape and sand to get the heavy stuff up, and then a hearty dose of primer and two coats of paint. The only problem? There wasn’t enough panelling to wrap the new toilet nook.

I debated custom milling this, leaving it blank, and every other option under the sun. Eventually, I decided to incorporate a complimentary tongue and groove panelling with a decorative bevel, rather than a bead. From a distance, this subtle difference is indistinguishable, but up close, you can clearly tell it was added. This is exactly how I like my preservation design decisions to go: complimentary but still visible to the trained eye. I don’t want to trick anyone into thinking that area was always part of the bathroom, but I also don’t want to make it obvious that it wasn’t.
The only challenge in all this was the moulding capping the wainscot. This was not easy to replicate. The original crown is two pieces of trim, layered one on top of each other. The bottom piece is a pretty standard cove moulding, but the top is not something you can grab off the shelf at your big box store. I did not take this into consideration, because as we all know I am not a finish carpenter, so with all of two days’ notice, I sent a panicked call out to my favorite carpenter Kent, and he milled me the perfect replica. He basically took regular dimensional lumber, rounded off the outer edge a bit, and cut in two channels. Nail some store bought cove moulding under that and you have a damn convincing replica. I was, and continue to be, astonished by Kent and wish he could live in my backyard and fix all the things for me all the time.

The Wallpaper
Oh, you didn’t notice the wallpaper? Understandable, it’s pretty understated.
It’s no secret I love wallpaper. I knew I was keeping the wainscoting, was set on a white shower, and wanted to keep the room bright. I ordered about one million samples of wallpaper, and really went all out sampling every pattern, color, and style that’s ever caught my eye. I polled the office and you all, and the winner was clearly a warm toned bold floral. It would have been lovely.
But I was in love with two others. Option A was soft subtle geese, and Option B was the one I ultimately selected. I absolutely love it for several reasons.
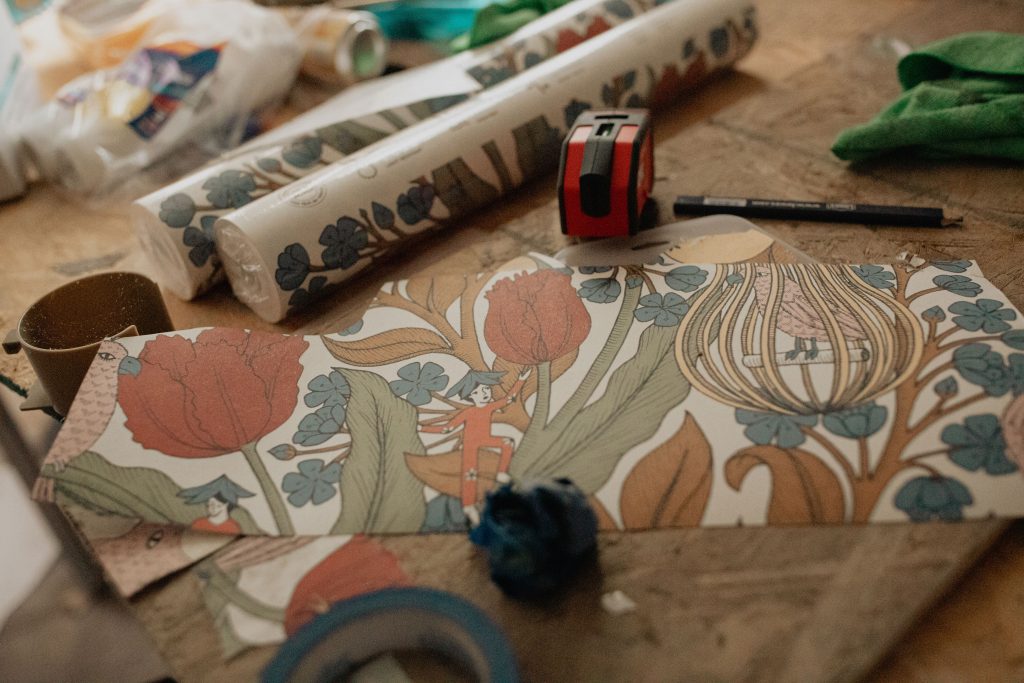
First, upon first look, it looks pretty old house traditional, maybe a little wacky in the colors but not crazy. Upon further inspection, you start to notice little flower people playing instruments and sitting on petals and I just love it. It’s mildly asiatic in influence, without being problematic.
It also has a bright white background. This worked for my tile, and for my installation skill. It is SO MUCH EASIER to install wallpaper with a white background. If you have any gaps or issues it’s much less noticeable and forgiving. Given I had to install this paper around a tub and toilet and sink, that forgiveness was necessary. I’d also be remiss not to mention that this was the first wallpaper project my mom and I tackled, and it went incredibly well save for the fact that it took much longer than expected and we ended up wallpapering until 3:00AM. It’s a good thing I’m an only child.

I love it more and more everytime I see it, and look forward to the day I’ll be able to soak in a hot bath and stare at my wallpaper for an hour.
The Other Stuff
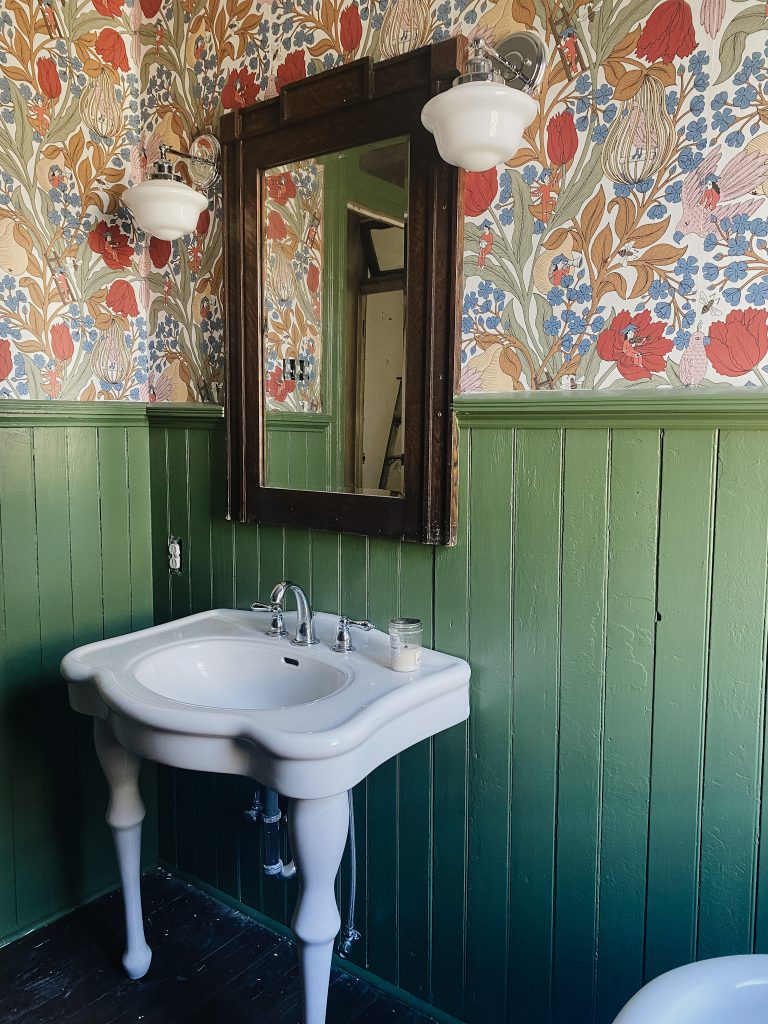
The sink and the mirror came with the house. The sink is not original but vintage, and appropriate for the age of the house. The Mirror is an old dresser mirror, and the wood works with the little branches so I kept it. Kent also framed around it, immortalizing it in place forever.
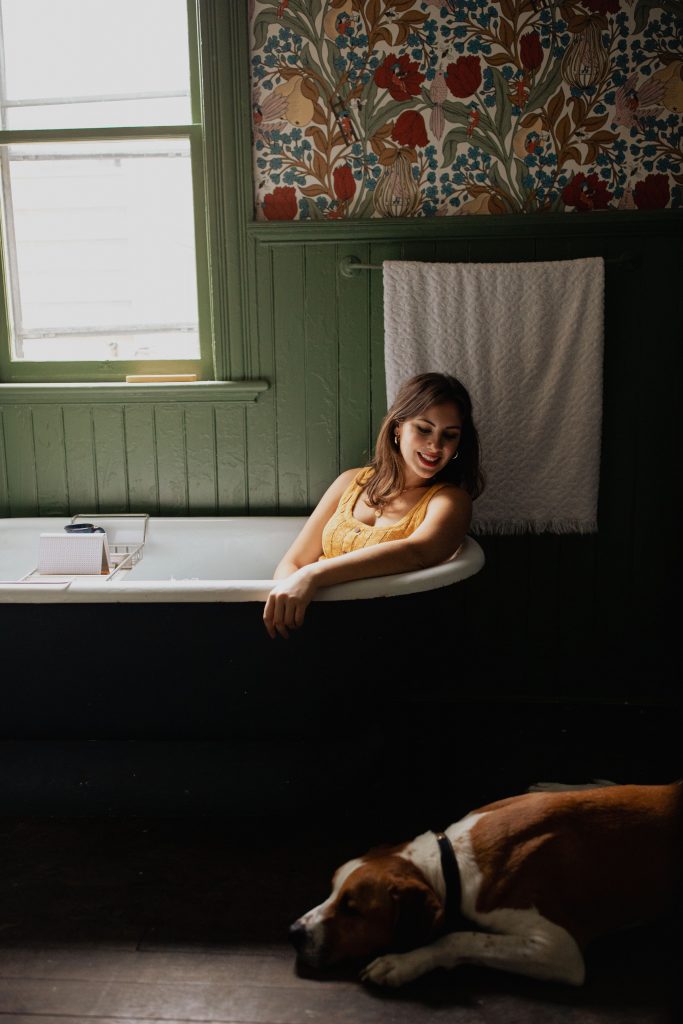
The overhead light was also in the house when I bought it. Probably from the 1930s or 40s. I got two new sconces that are complementary to the light, and flipped them upside down to mimic the hanging fixture. The tub I did absolutely nothing to except clean it, and the same goes for the floors- they were already there. At some point they could use a refinishing, but for now, a good scrub looks good to me.
So that’s that.
In the name of transparency, I had several big ticket items sponsored for this room. Roca Tile provided the subway tile and penny round. Vintage Tub and Bath provided the toilet and shower hardware. Wallpaper Direct provided the Coordonne wallpaper. Whenever I work with brands, I always lead with my design first. That is to say, I would never put something in my house because it was free. 9/10 I approach companies with the product I have designed for the space, and ask them if they’d like to work with me, so rest assured that any product I plug, I truly love and see the value in.
That being said, here’s the realistic budget breakdown
Labor $4,050.00
This was a project I did not want to screw up, so I hired it out. I was also doing it for a TV show, meaning my fast and loose approach to deadlines was not going to cut it. Hiring it out meant I was sure it would be done in time. The scope included redoing the shower, tiling it, installing all the hardware and toilet, repairing some plaster, patching in the paneling and miscellaneous plumbing.
I got seven boxes of double rolls with plenty left over
Misc Wood Panelling $150
Finish Carpentry Labor $500
Grand Total: $5,925.00
You’ll see that even if I hadn’t had some of these products sponsored, the total cost for my bathroom remodel really isn’t all that bad. That is because when possible, I try to use what I have and splurge on what I love. By doing things like keeping the bathtub, sink, mirror, panelling, and floors, I was able to spend on wallpaper and the shower. This is how I keep my budget in check, while still loving the final result. And I love the final result.


This is very cool. (I came to this falling down the Internet link-link-link trap, starting off with license plates to garage sales to renovations.) We remodeled our kitchen a few years ago and it took *months*, to the point where I just wanted people out. Of. The. House. I can’t imagine doing an entire building. I need a nap just pondering it. Good luck!
(Minor proofreading note: you used “complimentary” when you meant “complementary”. I’m a former editor, sorry. Old habits.)
Did you leave the floor as is?
Yes, there was some newer hardwood in here that is in good shape, just needs a refresh sooner rather than later
Beautiful. Will you be putting a door on the shower area?
Eventually! I’m going to see how much splash I get and live with it for a while before I commit